Regardless of the type of hydrangea, it is most often propagated by cuttings. This method is convenient and simple if you know the basic rules and features. With its help, it is possible to get a bush or tree to your taste. Gardeners often have a question about how to cut panicle or treelike hydrangea, because it is these species that are most conveniently amenable to the method of reproduction.
Dates and rules for cutting
Propagation by cuttings is carried out in late May and early June. For this, young growths, tops of shoots are used. Starting in mid-summer, you can use cuttings with the lower part, which will soon be able to wood. Root formation is best done at the time when bud buds are at the end of the branches, however, if lignification is complete, then rooting will be complicated.
 When using the described method of plant propagation, it is possible to maintain all varietal qualities. In general, the plant lends itself to reproduction all year round, except in winter. At this time, rooting at home can be performed.
In summer
Summer is the best period for cuttings. In panicled hydrangea buds should appear, therefore, to fulfill the task, green cuttings are used, on which there will be leaves and at least 1 bud. However, it should be remembered that only young bushes should be used.
On cuttings it is impossible that there were flower buds. Often, branches that are located below the bush are used. To achieve the desired result, they are not cut, but carefully nipped off. After they cut into pieces about 15 cm in length. The lower leaves are removed along with the petioles, and at the top the leaves are cut in half.
Important! It is forbidden to use material from bushes that are less than 1 year old for hydrangea propagation.
Sprinkle the bottom of the cut with powder or lower the material into the mixture to improve root formation. This action helps protect the plant from bacteria and germs. Gardeners often use greens for lubrication.
After the described actions, the material is placed in a substrate. For planting in summer, a classic moistened mixture based on 2 parts of peat and 3 parts of sand is well suited, it is possible to add humus from the leaves if there is no peat raw material. Placement is performed at a minimum angle of up to 3 cm in depth, and the distance between landings is up to 5 cm.

Immediately after planting, you need to sprinkle the soil with 2 cm of sand, close the plants with a jar to create a greenhouse effect or a bag. For young shoots, it is important to water every day and regularly remove cans for ventilation. In summer, in the heat, watering is done every day; in moderate weather, humidification is allowed every 3 days.
The optimal period for summer breeding of hydrangea is June 10 - July 15. Harvesting is best done in the early morning, as the stems will retain enough moisture. After about August 20, rooting should take place.
Did you know? Hydrangea has its own day, which is celebrated on January 5.
In the spring
Spring cuttings of panicled hydrangea is carried out until the moment when sap flow occurs near the bush. The best period for spring is March. The task is carried out using lignified branches from last year's bushes.
Cutting is done like this:
- Cut branches must be brought into a room where it will be warm enough, put them in water. Often the branches remain up to 5 days in this state.
- Cutting is carried out into parts, each of which should have 3-5 kidneys.
- Processing is carried out using root formation stimulants. To do this, you can use the means of "Epin", "Heteroauxin", "Kornevin" and others.
- Then it is planted in the soil, sand and peat in a ratio of 1: 2 will do. You need to place the plant on 2/3 of the entire length with a distance of 5 cm from each other.
- Close the container with a film or cover each stalk with a jar, leaving it to take root in a warm place.
In order not to buy root-forming drugs, you can prepare them yourself. To do this, dilute 1 tsp in a liter of water. honey, place 1/3 of the cuttings in a liquid and leave for half a day. Rinse the material immediately with water.
After planting, hydrangea will not need strong care. For growth, it is enough to give the right amount of moisture and make sure that the soil does not dry out. A correctly carried out procedure gives roots in a month. Transplantation into the ground at the site is carried out 1-2 months after rooting. For the winter, it is necessary to shelter the bushes from frost, because they are young and weak.
Important! Cuttings in the spring allows you to multiply the bush, and also give it the desired shape due to pruning.
Fall
Autumn may be suitable for grafting woody plants, which gardeners often send to the compost as scraps. The optimal period is mid-September. The shank should include from 3 knots, at the bottom a cut is made under the first perpendicular to the shank. All sheets are cut off, at the top they remove about 2 cm from the 3rd node. Only the petioles are left below, and at the top they are shortened by half.
Video: Propagation of hydrangea by cuttings in the autumn
Experts advise using clay pots for the fall, because they perfectly pass air and remove excess moisture. Inside the pots, initially drain about 4 cm, then the prepared soil. A classic option based on peat and sand is suitable for the substrate, but there is another option, specifically for autumn. Gardeners in equal shares mix coniferous litter, 5 cm of a layer of soil under it with sand and humus. Before planting, treat the cut sites with preparations to accelerate root formation. Landing is done 4 cm deep at an angle of 60 degrees.
Pots are closed with a jar or film, which helps to preserve the sheets, excluding their drying out. The most important thing in autumn cuttings is to create a comfortable temperature and optimal light. Watering is carried out 2 times a week and more often. Covering the pots can not be removed, if cans or film are not used, then you need to use a spray bottle. Hydrangea is sprayed 2 times a day.
Important! Hydrangea is very fond of moisture, so drying out the soil can destroy the bush. After the appearance of the first shoots, the film is removed, in the presence of 2–3 sheets can be transplanted to the garden.
The emergence of roots occurs in a month. This can be understood in the presence of swollen kidneys and new leaves. Jars on the pots remain until the stalk has taken root. After the formation of new sheets, you can abandon the greenhouse effect. The task of the gardener will be constant watering and spraying.
The temperature must always be stable.. Even drops of up to 2 degrees can adversely affect growth and ruin hydrangea. As soon as spring comes, planting is done for growing or directly in the garden. If you plan to plant in the open ground, then the pots are left on the street for 1 hour every day, gradually increasing the time. This helps the seedlings to harden.

How to root hydrangea cuttings
For quick rooting, you should use special stimulants, including Epin Extra or HB 101. After this procedure, the bottom of the cut is dusted with Kornevin powder or granules, allowing the roots to form quickly.
For the appearance of roots, shoots should be left in the following solutions to choose from:
- 2 ml of Epin is diluted in 2 l of water, the stalk is left for 12 hours.
- Means "HB 101" diluted in 1 liter of water to 3 drops, leaving the plant for 30 hours.
- "Kornevin", "Zircon" and other drugs are used according to the instructions.
Did you know? Each gardener can independently adjust the color of hydrangea, if you change the alkalinity and acidity of the soil.
Preparation of cuttings
To prepare the material for planting, so that the bushes can multiply, it is necessary not only to correctly cut the stalk, but also to remove possible buds with color. The upper shoots are used, on which 2-3 leaves are left. Only healthy and strong branches are chosen. The stems are divided into elements, with a knife they make a cut at 90 degrees below the first knot 1 cm. At the top, the cut will be at 45 degrees 1 cm above the knot. All sheets at the bottom need to be plucked off, and on top halved.

Landing
In addition to cuttings, the preparation itself requires soil. For planting, you will need a container, substrate and water. The process is as follows:
- Peat and sand in a ratio of 2: 1 are suitable for the correct formation of the root system.
- The finished mixture is watered and leveled in a pot.
- A surface of 2 cm is sprinkled with sand.
- Hydrangea is placed up to 3 cm deep at an angle of 45 degrees at a distance from the cuttings of about 5 cm or more, so that the sheets do not touch the soil.
- A spray is made by spraying with water.
- The pot is covered with a film or special plastic caps.
- A container with hydrangea cuttings is left in the shade or in a dark place and watered 1-2 times a week or every day if it is hot outside.
Important! Before planting the stalks, it is recommended that all sections be treated with brilliant green or garden varieties to protect against viruses.
The right conditions allow the root system to develop within 3-4 weeks. You can find out about this with the help of new leaves on the handle.

Care for cuttings
As soon as the roots appear, the banks or the film need to be removed, and the cuttings themselves transplanted into separate pots that are filled with earth, peat and sand 2: 2: 1. In such soil, growing is carried out, preferably in the shade, excluding the ingress of sunlight. Throughout growth, it is important to monitor moisture and water as needed. The plant does not require other rules of care.
Landing on a site for continuous growth is carried out next spring, but with hardening on the street or balcony. If the stalk is weak, then it is better to transplant it to the school from the beginning.
Important! If you transfer the cuttings immediately to a hot room, then they will give a sharp growth of shoots, and the bush itself will rapidly stretch.
Before the advent of the root system, it is imperative to use dark places for growing. This protects against overheating. The optimum temperature during the day is +20 ... + 25 ° C, at night - +15 ... + 18 ° C. With roots up to 3 cm, you can plant in separate pots with a height and diameter of not more than 10 cm.

Before winter, you need to take care of protecting the shrub from the cold. For this, dusting with dry leaves is suitable, and around the plant make installation of supports and cover everything with a film, coniferous branches. This method should be applied 2 years after planting by cuttings. Due to this approach, hydrangea will be able to adapt and give a rich color, which will also indicate the acquisition of frost resistance.
How else can hydrangea propagate?
There are other options for how to breed hydrangea.
If the method of cutting is not suitable, then it is recommended to use the alternatives:
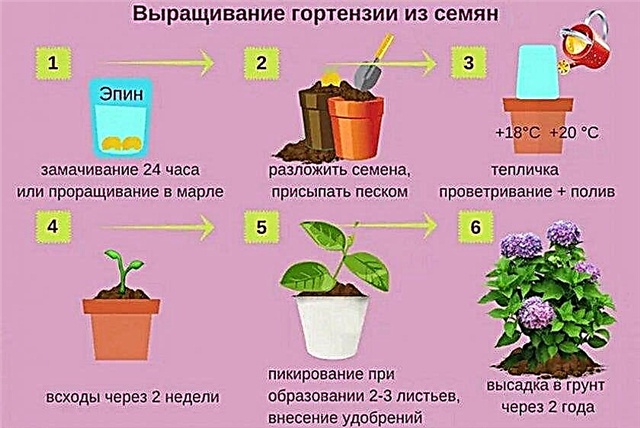
- Seed method - It makes it possible to get many shoots that will create a hedge on the site after transplantation. Sowing seeds is done on seedlings from February 20. The soil is used loose on the basis of leaf substrate, peat and sand (4: 2: 1). After sowing, sprinkle with soil 1-2 cm and pour, cover with a film.
- Layering - An actual technique for the summer, while there are no buds on the bushes. The shoots at the very bottom of the bush are cut and attached to a dug groove of 15 cm. The outer part of the branch is slightly cut, a match is inserted into the cut to accelerate root formation. The shoot itself is covered with soil and watered. In the fall, the root will have a root system, which makes it possible to plant a plant from the main bush. However, the material itself is still weak, so it is grown in a greenhouse. The next year, when spring comes, it can be transplanted to the site in the open ground.

Panicled hydrangea is a species that is considered the most beautiful of all and is perfect for a garden. Despite external parameters, the bush is unpretentious in leaving and will not cause many problems to the gardener. Cuttings for such a plant is the most convenient, affordable option to grow it and embellish the area near the house.


