A novice farmer, having decided to try his hand at raising chickens that are not familiar to everyone, but smaller ones, but which have a host of other advantages of quail, in addition to arranging the premises and acquiring cages, must ensure the correct supply of food and water to the birds. About what types of feeders are suitable for quail, how they differ from each other, and how to make such a structure with your own hands, using available materials and tools, is described in this article.
Basic requirements for quail feeders
First of all, it is necessary to achieve optimal design convenience for both "parties" - both the quail itself and its owner. The requirements for the device for feeding food for people and birds are different, so you have to consider both.
Important! A well-organized power supply system reduces costs associated with the purchase of feed by 35% without loss in productivity. Moreover, preventing feed from getting on the litter and mixing it with litter minimizes the risk of developing intestinal upsets and dangerous infectious diseases such as coccidiosis or salmonellosis.
A feeder that satisfies most of the following requirements can be considered good:
- Environmental friendliness: The materials from which all structural parts are made must be non-toxic. A good choice is galvanized steel, wood, porcelain, unsuccessful - plywood (particleboard, fiberboard, OSB), polystyrene, polyurethane, polystyrene foam, polystyrene.
- Reliability: the feeder should be made in such a way that the birds could not break it with their beaks.
- Sustainability: gathering around the platform with food, birds always create a fuss, so an unreliably installed structure can overturn or overturn, injuring them at the same time. On the other hand, too heavy a feeder makes disassembling and cleaning uncomfortable, therefore it is better to provide competent fasteners for the feeder than to make it from heavy material.
- Easy to clean: This requirement implies, on the one hand, the possibility of easy dismantling of the device, on the other hand, its manufacture from a material that is easy to clean (wood and plywood in this sense clearly lose to plastic and stainless steel).
- Availability: birds should not have difficulty approaching the feeder and extracting food from it.
- The presence of sides on the platform for the placement of feed: as practice shows, perhaps the main factor that worsens the profitability of poultry farming is that a significant part of the feed wakes up in the process of pecking and later, when mixed with litter, it becomes unusable.
- Installation at the level of the chest of birds: such a height, on the one hand, makes the food accessible to birds, and on the other, eliminates the situation when quails climb into the feeder with their feet, polluting and sprinkling food.
- Optimal sizes: are selected individually, taking into account the number of birds available and planned. Quails should not be allowed to crowd around the feeder. In addition: it is necessary that the tanks intended for food were obviously larger than the amount of food that is needed to saturate the entire herd.

Types of feeders
On the market you can find many different feeders for poultry, but all of them can be divided into four main types:
- bunker;
- grooved;
- tray;
- automatic.
Bunker
A bunker feeder is a device, the essence of which is the availability of a separate, inaccessible to poultry tank, where a certain supply of feed is stored. Using a variety of designs, this tank connects to an open platform, on which there is exactly as much feed as the birds need for one meal. As the platform is emptied, the dry mixture from the storeroom (usually under the influence of its own weight) enters the feed platform and replenishes the volume eaten by the bird.
Did you know? Quail are the closest relatives of chickens. These are the smallest representatives of a large family of chickens, with a maximum body length of 20 cm and weighing no more than 160 g. Quail are at least 20 times smaller in size than their most common relative in the world - domestic chicken.
How this works, you can understand by considering the drawing of one of the options for the hopper feeder: An even simpler version of the hopper device is as follows:
- A ready-made container with a wide neck without a lid is taken (for example, a plastic bottle with a bottom cut off).
- On its sides small semicircular or square recesses are cut.
- Feed is poured into the tank.
- From above it is covered with a wide pallet with sides, after which the structure is turned over.
- Under its weight, the grain begins to spill out of the recesses onto the platform, where a quail can peck it. As soon as the spilled grain is eaten, the contents of the bottle sag and “dispense” a new portion of the feed.
This simplest device can only be placed inside the cage, so it cannot be considered very convenient, since it does not meet the requirement of reliability and stability, however, more complex structures (such as shown in the drawing) can be mounted outside the cage.
- Bunker feeders have a number of undeniable advantages that allow you to:
- protect the main part of the feed from spilling, pollution and getting wet;
- save time and effort on a regular supply of food to the bird (you can fill up any necessary supply of grain mixture in the hopper, from the daily portion to the amount for several days);
- easy to clean all parts of the structure;
- to provide the bird with constant access to a fresh portion of grain (it is the bunker feeders that make sense to install in cages for young animals, which need more frequent feeding);
- to exclude “excitement” around the feeder, which always occurs when food is served on a schedule, as a result of which the risk of injury to the bird and damage (tipping) of the device itself is reduced;
- solve the problem of feeding the feed without any special difficulties and costs, picking up or even inventing and independently making any of a huge variety of modifications (thanks to this advantage, bunker devices are used to grow almost all types of farm animals, regardless of species, breed and size).
- Similar constructions have disadvantages:
- limited feed composition for which the device is suitable (only grain, grain mixtures and combined feeds can be stored in the hopper, which means that other devices must be provided for green and wet products);
- the inability to control the amount of food consumed by the bird, which is part of the correct forecasting of production costs, and in addition, can lead to an imbalance in the nutrition of quail;
- instability and unreliability of the simplest design options and the need for additional costs for arranging more complex ones.
Groove
Groove feeders are a long object with a recess along its entire length (for example, a pipe section cut in half, a half-beam of a tree hollowed out from the inside, a tray made of boards, plywood, plastic, galvanized steel, etc.). This tank is attached to the outside of the cell and the feed mixture is poured into it. Birds, sticking their heads through the bars, get free access to food, but can not climb into it with their feet.
Did you know? An interesting feature that distinguishes quail from chicken is that small and shy birds prefer to be in the dark, and therefore do not need to bear the additional cost of exposure to increase egg production.
A similar feeder may look like this (bottom drawing):
- The advantages of grooved devices include the fact that they:
- fully satisfy the requirement of stability, reliability and hygiene;
- can be used for any type of feed;
- very easy to manufacture (the choice of materials for this purpose is extremely wide), as well as in installation;
- provide a large area of bird access to food;
- with proper installation, they are easily removed and cleaned;
- allow you to control feed costs;
- minimize spilling of the product from the tray, and if this happens, the fallen feed does not enter the cage, where it will be trampled and mixed with droppings, but beyond. Thus, by installing a primitive pallet under the tray, you can collect all the losses and reuse them (of course, the above applies only to dry mixes, wet foods cannot be stored for a long time and therefore their uneaten leftovers must be destroyed).
- Among the shortcomings of the groove feeders, it should first be noted:
- unilateral access of birds to food requires a significant increase in the length of the structure compared to a round or square pan feeder (in cages where the width is comparable to the length installed on one side of the feeder, it may not be enough to ensure free access to it for all the inhabitants of the "room") ;
- the need to fall asleep feed for each meal (the inability to create feed reserves, which will be automatically served as necessary);
- the costs of dismantling before each cleaning and re-installation after it.
Tray
The most primitive type of feeder is a trough. In fact, we are talking about the usual capacity (trough, pan with sides, etc.), into which the feed is poured, after which it is put into the cage.
Did you know? Quail, unlike chickens, is very positive about crowding. Surprisingly, with a high crowding in the cage, these birds rush much better than in the presence of large open spaces (the more laying hens, the higher their egg production).
A complicated version of such a device is shown in the drawing:
- There are few advantages of this method of serving food, among them we can only distinguish that they:
- do not require any costs for the acquisition and installation (any old basin with low sides or a cut plastic bucket can be used as a tray);
- provide access to food from all sides, so you can use more compact containers;
- Easily removed from the cage for cleaning.
- But the list of drawbacks of tray feeders looks rather long:
- unstable and easy to tip over;
- do not protect the feed from spilling and trampling, which has a very negative effect on the sanitary and financial side of bird keeping;
- require constant opening of the cage to feed and then remove the empty feeder for cleaning (this scares quails, increases the risk of injury or escape).

Automatic
Automatic feeders are essentially the same bunker devices. In some sources, these concepts are considered synonyms; in others, the most complex bunker models are classified as automatic, where the “feeding” of feed is carried out not by mechanical subsidence under the influence of its own weight, but dosed, using a special mechanism.
Important! Automation in the feed can be provided by two additional options: a dispenser and a timer, which starts the mixture supply system at predetermined intervals.
One of the options for the electrical circuit used during the operation of the automatic feeder looks like this: Automatic feeders have all of the above advantages of bunker, in addition to which automation solves the main drawback of the bunker device - uncontrolled feed to the bird. In this case, food is supplied not only in the required quantity, but also according to a strictly planned schedule, that is, practically without human intervention and with a minimum risk of error.
Such constructions have only one, but, unfortunately, a very significant drawback is their price. Such luxury is available only to large poultry farms, where such costs are economically justified and will soon pay off. In private farmsteads, it is more realistic to get by with a bunker model.
How to make a quail feeder with your own hands
Almost any type of quail feeder (including, if certain skills are available, automatic) can be made with your own hands, and the simpler the design, the easier it is to realize it, using literally what is at hand. Below are detailed instructions for making three variations of feeders:
- half open bunker system from a sewer pipe;
- a protected mesh tray structure made of metal profile;
- device flute type from a plastic bottle.
From a plumbing pipe
Cuttings of plumbing pipes very often remain on the farm after repairs made in the house. Since the quail is a small bird, it’s quite possible to use such leftovers to make a feeder or purchase them in building supermarkets literally for a penny.
Video: feed and drinker from a sewer pipe
Materials and tools for work
For the manufacture of the product you will need the following materials:
- PVC sanitary pipe with a diameter of 50 or 90 mm (if a thicker pipe is available, you can use it, but for small birds the specified parameter is enough) - the length of the segment corresponds to the length of the side of the cage where the feeder will be attached, plus a small tolerance for connecting to the hopper ;
- elbow for connecting the pipe to the hopper;
- a plug so that the feed does not spill out through the opposite hole in the pipe;
- wide latches for fastening the finished feeder (sold in stock in the construction or plumbing departments);
- a container for storing food (you can use a plastic bottle of the appropriate volume, taking into account the number of birds in the cage);
- a strip of solid material (board or plywood, also an excellent building level) with a width of about 80 mm; length - preferably corresponding to the length of the feeder - for marking;
- a small piece of board or plastic up to 80 mm long for making a pattern (optional).
Important! Experts recommend that you do not deviate from the proposed hole sizes for accessing the feed and the closed islands between them. If the holes are made too long, the pipe may curl up, small holes increase the risk that the bird will become stuck in their heads, rare ones provide access to the feeder to a limited number of individuals, etc.
Of the tools you need to stock up:
- a hacksaw or a jigsaw (files should be used with small cloves, for working on metal, otherwise the pipe may become deformed or even burst);
- screwdriver;
- screwdriver (drill with a diameter of 8 mm for metal work);
- marker, pen or felt-tip pen (for marking);
- ruler, tape measure or other measuring tool;
- a file or sandpaper (to clean the edges of the pipe after trimming);
- wide-head self-tapping screws (to fix the finished feeder to the cell wall).
When performing work, be guided by the following image:
Step-by-step manufacturing instructions
Progress:
- Make a pattern. Cut a prepared piece of board, plastic or other material so that a length of approximately 80 mm in length and 50 mm in width is obtained. Both of these quantities will be needed in the work.
- Put the prepared pipe on a horizontal surface and fix it well so that it does not roll during operation.
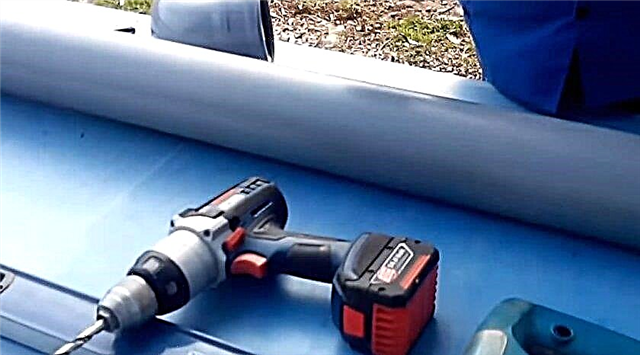
- Put a pre-prepared board, plywood or level on the pipe and circle it on both sides with a felt-tip pen or pen. As a result, two parallel lines should be obtained along the entire length of the pipe at a distance of 80 mm from each other.
- Armed with a “pattern”, markup for future holes. To do this, stepping 10 mm from one end of the pipe, lay a bar on it - first in length, then in width, each time marking the end of the pattern. As a result, the entire pipe should be marked into unequal sections, 50 and 80 mm in turn.
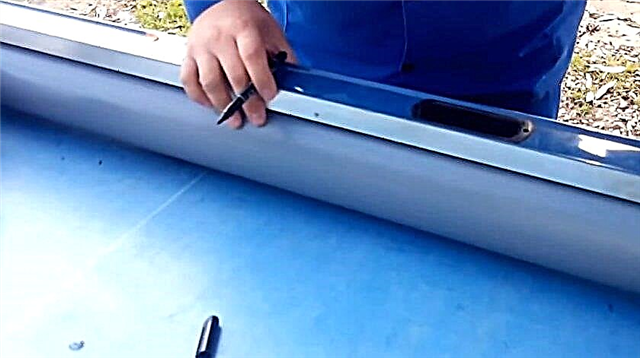
- In order not to make a mistake when drilling holes, shade longer (or shorter - optionally) segments.
- Proceed to saw openings to access the feed. First, use a screwdriver in the marked areas to make two punctures in two corners located diagonally in relation to one another.
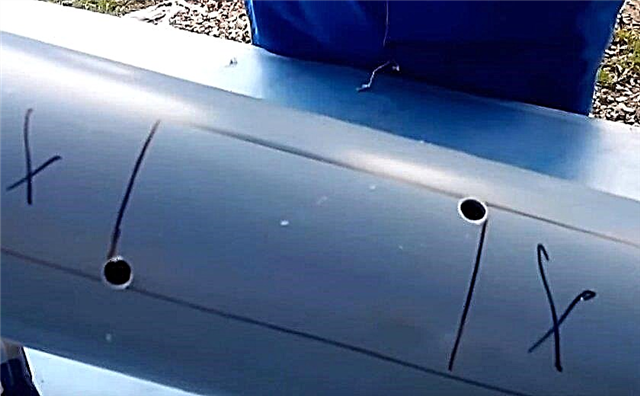
- Carefully cut the rectangular holes with a jigsaw or hacksaw (start cutting from the hole, this will prevent the pipe from deforming and making the work more accurate).

- Armed with a file or sandpaper, carefully process all sides of the holes. If you leave sharp edges, small quails, sticking their heads into the holes, can be very seriously injured.
- The feeder is almost ready. It remains with the help of a knee to connect one end of it with an impromptu hopper installed with the neck down, and plug the other end.
The finished device is attached with special latches to the outside of the cage.
From profile
This version of the feeder requires more serious skills, but the result is worth it. This option is best suited for keeping chickens. The quail chicks grow quickly, and therefore grooved or hopper feeders, which are attached to the outside of the wall, are not suitable for small birds: at the initial stage, the birds will not be able to reach the feed, and after a while they will be forced to bend to it.
A metal-coated metal structure installed inside the cage perfectly solves the problem, on the one hand, making access to food as simple as possible, on the other, protecting the contents of the container from uncontrolled spilling.
Video: DIY bird feeder
Materials and tools for work
Before you begin, you must stock up the following components:
- profile made of galvanized steel, Gosstandart 14918–80, or steel with a polyester coating (a minimum width of 100 mm is sufficient, although a wider profile can be used - the length depends on the size of the cage and the number of birds, in fact, there are no special requirements );
- a metal mesh of the same length as the profile, the width will be cut off during operation (mesh size - approximately 15–20 mm).
The tools you need are:
- scissors for metal or angle grinder (colloquially - “Bulgarian”);
- pliers or pliers.
The drawing of the feeder from a metal profile looks like this:
Step-by-step manufacturing instructions
Progress:
- Using a scissor or grinder, cut the mesh size exactly matching the profile width (the mesh should cover the feeder and protect the feed from spilling). In length, the mesh should be 80-100 mm shorter than the profile so that it can be bent from two end faces.
- Using the same tool, make several paired (about 10 mm apart) cuts along the entire length on the sides of the pipe so that they can be used to fix the mesh. The more cuts are made, the less likely the chicks will fail the net. The ideal step between the "pairs" is 40-50 mm.
- From both ends of the profile, in the place of the lower bends, make two long cuts opposite each other with a length of 40-50 mm (the installed mesh should end on both sides at the level of the beginning of the cuts).

- Insert the grid into the profile.
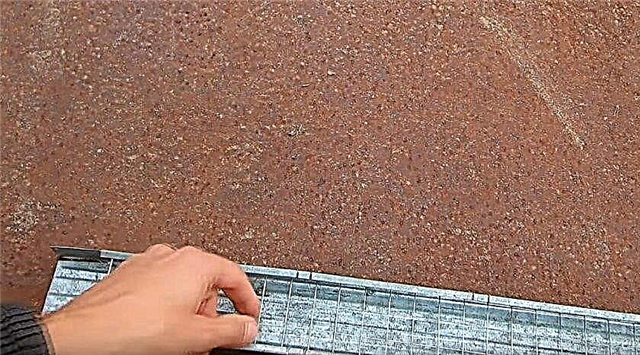
- Using pliers, bend the ends of the cropped profile, grasping the rods of the grid.
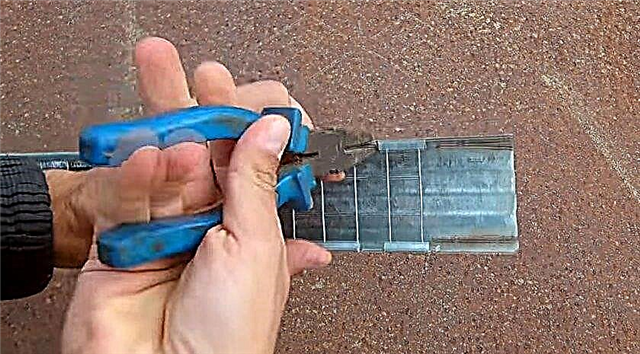
- Bend the profile with two pliers on the line of the incisions made using pliers.
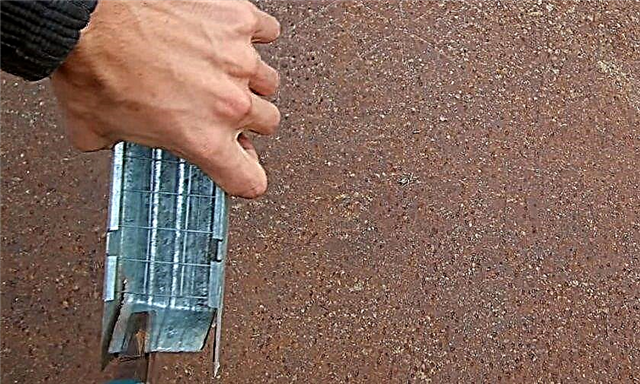
- The lateral sections of the profile that are not bent, also direct with the help of pliers to the center to get a protected side.
- Carefully inspect the finished feeder for safety. All sharp edges must be carefully folded. If necessary, they can be polished with a grinder.
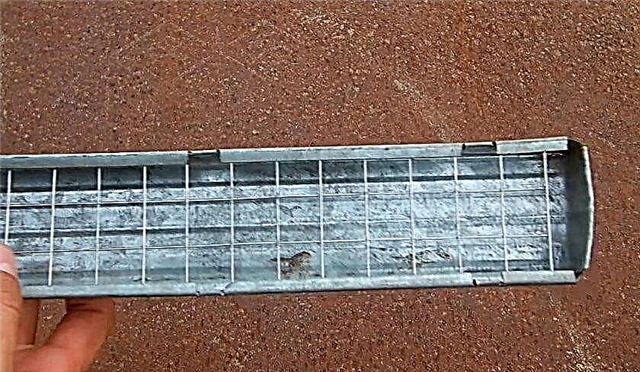
The feeder is ready, now you can pour grain or starter feed into it and put it in a cage for young animals.
From a plastic bottle
Finally, the simplest version of the express feeder can be built from a regular plastic bottle. With a large number of birds, this design is hardly worthy of attention, however, in a small homestead farm, especially if quails are not grown on an ongoing basis, but as a temporary or seasonal hobby, a very cheap flute-type feeder will be a great way to save time and money.
Video: quail feeder made of plastic bottles
Materials and tools for work
To make a plastic feeder, you will need quite a bit:
- two plastic bottles (for small quails it is enough to use a container with a volume of 1.5 or 2 liters);
- a small piece of thick plywood (approximately 10 mm in diameter);
- galvanized steel strip, paper clips or wire for making hooks.
From the tools you need to prepare:
- cutting device (knife or sharp scissors);
- jigsaw or hacksaw;
- construction stapler (you can use a hammer and small nails);
- marker or marker for marking;
- a sheet of loose cardboard to make marking more convenient;
- lighter or matches for sharp edges.
A plastic bottle feeder looks like this:
Step-by-step manufacturing instructions
Progress:
- Cut the upper parts of the plastic bottles in such a way that they get the same pipes around the circumference with a sealed end (the narrowed part of the container must be completely cut off, for this you need to deviate from the neck at least 50 mm). To make the cut even, it is better to use preliminary marking: wrap the bottle with a sheet of paper or cardboard so that the end of the sheet is at the level of the line of the future cut, then use a felt-tip pen to draw a line around the entire circle, moving along the edge of the paper.

- Put the bottle in a cropped plane on a sheet of plywood and with a felt-tip pen draw a circle around the circle corresponding to the cut area.
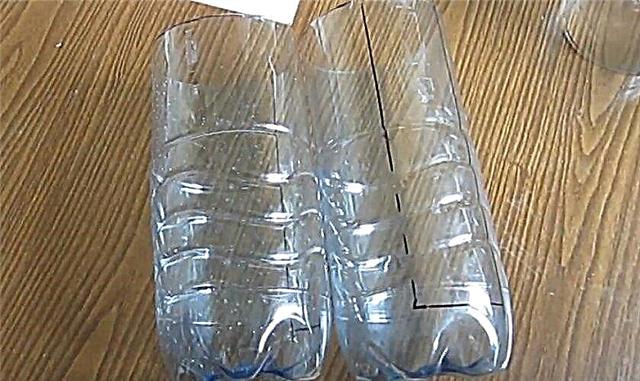
- Using a jigsaw or hacksaw, cut out the intended circle from the plywood.
- Mark the line of the future cut on the cut blanks from the bottles for a gutter. To do this, draw on both bottles two longitudinal lines at a distance of about 40 mm from each other; the cut should end no less than 50 mm to the bottom (in this place, connect the parallel lines with a perpendicular line).
- Cut the gutter according to the marking.

- Connect the two halves of the future feeding trough by planting the cut bottle with the cut ends on a prepared circle of plywood.

- Attach both sides of the plastic to the plywood with a stapler or nails.
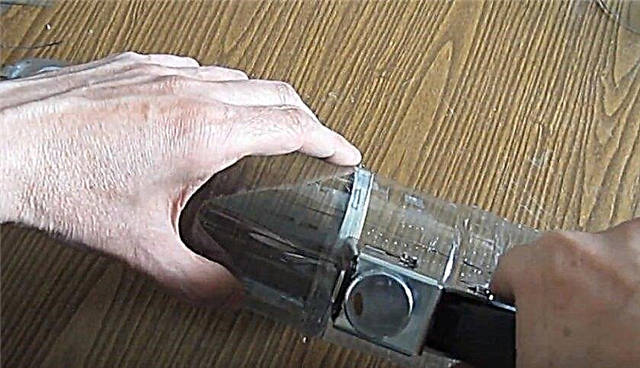
- Carefully inspect the structure for the absence of protruding sharp ends.
- Using a lighter or matches, melt the edges of the plastic so that they become smooth and the quail does not hurt the throat, sticking its head into the feeder.
- To prevent food from waking up, make small cuts on each side of the junction of the plastic with plywood, as well as on both sides of the bottom of each bottle, then bend the loose strips inward.
- From thin strips of galvanized steel, paper clips or wire, make simple hooks, attach one end to plastic (to work with steel, you need a drill and screws, you can simply pierce the plastic with wire), the second end sprinkles on top of the cage rods. Such a device is very easy to mount and remove, which makes it simple and convenient to operate.
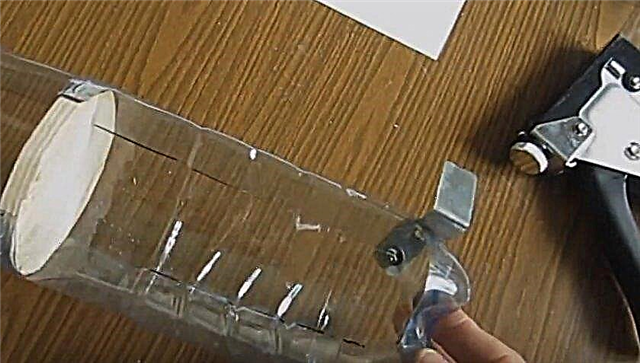
Cage feeders
The technology for installing feeders in a cage directly depends on their type. If the design is made of a plastic pipe and provides for semi-automatic feeding of feed from the hopper, it is necessary to fix it on the front side of the cage under a slight slope, this will ensure grain movement along the entire length of the gutter. In the absence of a hopper, the pipe can be attached strictly in parallel: in this position it will be much more convenient for birds to remove food from the holes, however, it will be necessary to pour it into each of them, and before cleaning the feeder, pour it into one container and reuse it. A similar construction is made of plastic bottles.
Important! Install feeders in the cells in such a way that for every adult accounted for at least 3-5 cm of free space at the tray.
Tray chick feeder made of profile does not require special installation. It is simply put into a cage and removed from it after the bird has taken food for cleaning and re-filling. Galvanized steel is a rather heavy material compared to the weight of quail chickens, and the low sides of the feeder and its long dimensions make the structure quite stable, minimizing the risk of overturning. Nevertheless, even in this case, it is better to provide for a small elevation in the cage, on which a feed tank will be installed, since stamping paws on the feed, even protected by a grate, is categorically not welcomed from a sanitary point of view. Speaking about the installation of feeders, it should be noted once again: no matter what modification of the container was chosen, it should not be fixed in the cage or outside it “tightly”. Fasteners should be selected according to the principle of reliability and the possibility of easy removal and reinstallation (recall, the feeder must be cleaned after each reception of wet food, and when using dry mixes - simply as often as possible).
Basic feeding rules
Although quail is a relative of chicken, its digestive system is much more sensitive, and therefore small birds have special requirements for a properly balanced diet. The basic rules that must be observed when compiling a diet of quail are as follows:
- Feed consumption per adult bird ranges from 25 to 30 grams (normal monthly consumption is approximately equal to one kilogram). Excess food adversely affects the health of quail, primarily affecting the liver of a bird.
- Feeders and drinking bowls must be thoroughly washed at least once a day.
- Regardless of what type of construction is used, wet containers cannot be laid out in dry feed containers and vice versa.
- It is very important to ensure that in direct access quail always has fresh purified water at room temperature (in the cold season, it is advisable to heat the water to a warmer one).
- Quail food should be fresh and very high quality.
- Wet types of food (mixers, vegetables, fruits, etc.) can be left in the feeders for no longer than two hours, and then mercilessly destroyed, otherwise serious quail disorders can begin in quail.
- For wet foods, experts recommend mixing cereals, because too viscous food is absorbed very poorly by the gastrointestinal tract of quail.
- Control over the color and consistency of litter is a necessary requirement for the proper care of quail. Feces in healthy quail have a dense structure, the main color is dark, with the presence of light inclusions. Liquid green feces indicate an inflammatory process, and yellow and watery stools most likely indicate that birds receive too much carbohydrate food.
- At the first sign of diarrhea, the bird should be stopped feeding, making sure that she consumes as much fluid as possible. It is recommended to add disinfectants to drinking bowls: a weak solution of magnesium permanganate, a decoction of chamomile or wormwood, etc. Expressed liquid has boiling properties after boiling round-grain rice or oatmeal.
- If you want to use feed for feeding quails, it is recommended to give preference to products intended for laying hens or (slightly worse) - for broiler chickens.
- Drawing up a diet for quail based on natural ingredients is welcome, but it is very important that such a nutritional plan be correctly balanced.
Did you know? The Japanese use a very unusual technology for feeding quail. In the Land of the Rising Sun, these birds receive only two components of nutrition, and in equal shares. One of them is rice, the second is fishmeal. Surprisingly, such a diet, as practice shows, fully provides birds with everything they need - energy, minerals and vitamins. In our latitudes, an adapted version of a simplified diet is sometimes used, which has also shown its effectiveness: quails need to give corn, soy and alfalfa flour in equal proportions.
The diet of quail must include:
- cereals (oats, millet, barley, corn, rice section);
- bean (peas, lentils, soybeans);
- fresh greens (clover, alfalfa, salads, in winter - germinated grain);
- vegetables and mixers (carrots, beets, potatoes, cabbage, etc.);
- fats in the form of seeds or meal of sunflower;
- squirrels - at least 20% of the total diet (boiled chopped eggs or egg powder, cottage cheese or milk powder, boiled meat or fish, meat and bone meal, maggots, worms, slugs, snails and other “living creatures”, which can be obtained independently or purchased in pet store);
- calcium and other minerals (chalk, crushed eggshell, small shells or gravel);
- vitamin supplements (in particular fish oil).
 As a carbohydrate component, crushed croutons can be added to the quail diet; in small quantities, you can use both white and black bread for their preparation. Growing quail is a troublesome, but profitable business. The success of the enterprise depends on how far the farmer managed to think through and implement all the conditions necessary for the health and normal development of the bird.
Important! The quail's digestive system reacts negatively to the green shoots of solanaceous crops (potatoes, tomatoes, eggplant, peppers), and buttercup plants (wrestler, anemone, catchment, calendula, etc.). Of cereals, buckwheat and rye should not be included in the diet of quail.
The choice of feeders plays an important role here: there are many modifications of such devices, but the most optimal of them have long been identified. If you have some skills and ingenuity, you can build an excellent feeding trough with your own hands, this will significantly reduce the cost of starting the entire business project.


